What is HDR?
For anybody not a secret, that digital cameras have limited enough range of tones. Frequently in one picture happens it is impossible to embody a full detailed picture with the expressed oscillations of light and dark tones. Therefore before us always there is a problem: or we choose a bright solar decline and we lose a part of the information on surrounding objects, or we see details of an environment, but the decline becomes faded; or we see everything, that happens behind a window, and we do not see that in a room in full and on the contrary. And so it is constant, it is necessary to make a difficult choice. However with new technology which now is accessible in Photoshop CS2 the compromise this compromise High Dynamic Range Imaging is found also!
Distinction between the brightest and dark sites of the image refers to as a dynamic range. Till now in Photoshop we have been limited by work only in a low dynamic range (LDR – Low Dynamic Range). LDR the image are limited in a range of luminance that is typical that the camera or the scanner can fix for one pass that certainly on much less in comparison by that our eyes perceive.
High Dynamic Range Imaging (HDR) images in a condition to display a full range of luminance, without dependence from that what width it can be. It means, that one HDR the image is capable to comprise details at the dazzling sun at midday, thus keeping details in depth of a cave! To achieve such effect probably only at presence of pictures of the same sites with different exposures, function HDR analyzes each image, and then unites it in one separate picture.
HDR the image “begins” with the image, containing a range of luminance which your camera in one picture cannot record. In this connection, as already it was marked earlier, it is necessary to make it by means of several pictures with a various exposure then all pictures will be incorporated in one 32-bit image.
However in spite of the fact that we have received the image containing a full range of luminance, it all the same will not look completely correctly and will display a range hardly smaller optimum. Therefore it is better to convert it in a 16-bit mode normally to unpack, and there was an opportunity to apply tools of a retouch and updating of the image. By and large for more or less normal display, on our computers and printers, it is enough and 8 bit modes that corresponds to 256 tones (for the information 32 bit – more than billion tones, 16 bits – 30 000 tones).
So what sense is asked by you? All very simply, first, the more depth of color, the more information contains the image and consequently appears more opportunities for updating, i.e. you will not be afraid of loss of details in those sites where normally it happens on images to smaller depth of color.
Also important value has the sizes of borrowed files. For example six pictures with a different exposure the greater space than will borrow on a hard disk one HDR a file. Do not forget also, that the less depth of color, the as a result turns out the smaller size of a file, and coming back to a theme of 8 bits, think, whether it is necessary to store a file in 16 bit mode, for example the same file with depth color of 16 bits (with adjusted layers) at me borrows 32 Mb, and in 8 bit mode only 4,5 Mb.
Exposure for HDR
To prepare some pictures for further creation HDR of the image it is meaningful only in that case if that you were going to remove has a wide dynamic range. There is quite logical question – «As it to define?»
The most convenient variant if your camera is equipped by such useful function as display of the histogram, whether by means of which and it is possible to define there is removed “scene” for borders of a range of your camera.
The histogram
Many cameras of middle class and practically all cameras of a high level are equipped by such function as dynamic display of the histogram. How it can be useful to us for HDR? Its viewing present, that under it the gradient is located, which contains all intensity levels from black (from a left edge) up to white (from a right edge). For the best understanding, look at the figure resulted below.
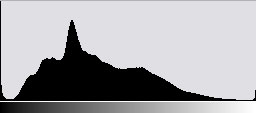
So you can look what tones in a gradient are used for creation of the image. The height of lines in the histogram shows as luminance within the limits of the image extends. If you will find even one strip sharply going upwards, concerning the others, at edges of the histogram, it will mean, that on the image there will be a significant part of absolutely black color (if this strip has appeared at the left) and absolutely white if such has appeared in an extreme right corner of the histogram. These are unique two cases when such strips have huge value for us. If they will appear somewhere in the middle will worry there is nothing, as, only absolutely black or white losses of details on the image lead.
So, the band in the left corner of the histogram shows, that options of an exposure will lead to that your image becomes too dark, details of tones will be absent.
The band in the right corner speaks us that as a result on the image we shall not see light details as the significant area will turn out shown up. And at last, if you have found out such details from both edges, it means, that the picture will contain very few details concerning different tones. So, if you and manage to get rid of one of such strips whom you an exposure would not mount such image our most that on is the true candidate in HDR images. So, we need to remove the same site with different exposures. As a rule such function is present at the majority of digital cameras of an average and high level and it refers to Bracketing. If such to find out it is impossible, make all manually, mounting a different exposure for pictures.
Some advice on pictures with a different exposure:
* Use tripod is will allow you to make equal pictures from one place with a different exposure.
* Use mode Aperture Priority (the Priority of the Aperture) or Manual (Hand-held) – and change only values of speed of a shutter between exposures. Change of adjustment{option} of the aperture changes depth of field that will be reflected in focus of each image which will be various and as consequence{investigation} smaller definition on HDR the image.
* Use adjustment of focus – by means of the given mode you will achieve, that the point of focus was identical to all variants of an exposure. As you understand use of automatic focusing at various exposures, essentially to consult with the problem{task} worse even if the removed object will not change the position. Use of different points of focusings can lead to effect of soft focusing on HDR the image.
* Use mode Bracket while a shadow do not send to averages of tone – i.e. by means of increase in speed of a shutter in each picture while the left side of the histogram is from the right side from the center of the histogram (do not worry about any strips which can will appear on the right as we shall get rid of their influence on the final image in the subsequent steps). Such method allows you to avoid occurrence of noise on the image.
* do not limit itself in a range of exposures – there will be nothing terrible if you make 5, 10 or 20 pictures for reception of a full range of luminance of a removed scene, the variant of transition of quantity in quality here is not excluded.
* do not suppose movements during shooting in an opposite case it will result or in
blur of the image, or to its bifurcation.
* do not forget about automatic mode Bracketing – not looking that automatics in many cases does not provide optimum work, to HDR it does not concern to preparation of images. Use of automatic shooting with different exposures will allow you to avoid many problems.
Now, when you know as correctly to make pictures for their integration in HDR the image it is possible to pass safely to process of integration.
Unite Images
HDR the image it is possible to receive having at least two images with various exposures in this connection pay attention, that your file contains Exif data about an exposure as Photoshop will be based on these data. (their loss can occur, for example if you kept images for a web or tried to compress jpg a file by means of erasing the superfluous information) if you used the film camera certainly such data at you will not be. In this case Photoshop will ask to specify all necessary information (an exposure, a focal length, sensitivity) an array/film) for the given image, therefore do not forget to record them at shooting
Merge to HDR in Photoshop CS2
Following mentioned below advice, you can prepare most qualitatively the image before integration:
* Watch strips – we already spoke about them, look behind that they were not both on the histogram, and before integration. If those at you have appeared it testifies that your pictures do not cover a full range of luminance, in this case pictures are better for altering.
* Watch values EV – in an ideal of value should differ in area 1 if you have less or more try to experiment with a toddler or to disconnect a superfluous picture.
* Check the image on effect of posterisation – whether again undertake a toddler and check up appears any color noise? If the effect is strongly expressed as in figure 3 then try to disconnect any picture from group, i.e. you need to find superfluous which can spoil effect.
* Set the depth of color necessary to you – at my subjective sight optimum value is 16 bit/channel something the average between 32 bit image and 8. In a real life if you are not engaged, vocational training of the image, it quite will suffice you.
What all the same to choose 16 or 32?
32 bit image represents an innovation for Photoshop, earlier users of the given product could not work in such mode. 32 bit image contains about billion intensity levels. For comparison the normal 8 bit image consists only of several hundreds. 8 bit and 16 bit image are limited by a range of luminance from black on dark up to white on light while 32 bit image can easily contain areas more darkly black color and accordingly more light white, as though it strange did not sound. At once I shall make a reservation, that Photoshop has no opportunity to you to show such areas, but 32 bit image are very useful at work with films and in 3D to the industry. In what mode to work to choose certainly to you, but it seems to me, you will waste all for nothing time if will prepare for the image for a press in a 32-bit mode as in any case cannot see all advantages of this mode in Photoshop so the choice on a variant of 16 bats here is better to stop.

